In this 3 part series we are going to learn a few methods for developing an Azure Function that uploads blobs to Azure Storage using the new Azure Blob Storage and Azure Identity Client Libraries.
Code: The code for this series can be found here: https://github.com/jongio/azure-blob-functions-managedid
Part 1: Local Function with Storage Emulator (local function, local storage)
Part 2: Local Function with Azure Storage and Service Principal (local function, cloud storage)
Part 3: Azure Function with Azure Storage and Managed Identity (cloud function, cloud storage)
Local Function with Azure Storage and Service Principal (local function, cloud storage)
In Part 1 of this series, we got the local function setup to upload blobs to a Azurite a local storage emulator. Now, let’s setup our Azure resources so we can use that same code to send our blobs to Azure using a Service Principal.
Azure Setup
Let’s get all our Azure resources created and configured.
- Install Azure CLI
- Login to Azure CLI
az login
- Set Active Azure Subscription
This ensures that all of the subsequent commands run under the intended subscription.
az account set -s SUBSCRIPTION_NAME_OR_ID
Parameters:
SUBSCRIPTION_NAME_OR_IDThe subscription that you want to activate. You can useaz account showto show the currently set subscription.
- Create Resource Group
This is a grouping for all of your Azure resources.
az group create -n RESOURCE_GROUP_NAME -l LOCATION
Parameters:
RESOURCE_GROUP_NAMEA unique name that you create.LOCATIONThe location you want all your resources to live. You can useaz account list-locations -o tableto get a list of all available locations.
- Create Blob Storage Account
This account will hold the blobs that you upload via your Azure Function.
az storage account create -n BLOB_STORAGE_ACCOUNT_NAME -g RESOURCE_GROUP_NAME --kind StorageV2 --sku Standard_LRS
Parameters:
BLOB_STORAGE_ACCOUNT_NAMEA unique name that you create.RESOURCE_GROUP_NAMEThe name of the resource group that you created earlier.--sku- List of available SKUs can be found here: SKU Types
- Give your account Blob Storage permissions
The sample uses DefaultAzureCredential, which uses AzureCliCredential under the hood to get a token to use to communicate to Azure Storage.
In order to talk with Azure Storage, your account needs to be in the Storage Blob Data Contributor role.
Get your account id:
az ad signed-in-user show --query 'objectId' -o tsv
Then run the following command to assign your id to the role
az role assignment create --assignee {id from last step} --role ba92f5b4-2d11-453d-a403-e96b0029c9fe
Parameters:
assigneeYour Azure account id.--role- The GUIDba92f5b4-2d11-453d-a403-e96b0029c9feis the ID for the Storage Blob Data Contributor role. You can find all of the built-in Azure roles here: Built-in roles for Azure resources
Configure Function App to use Azure Storage
- Set Local Settings
Open local.settings.json and ensure the following values are set:
If you have cloned the repo, then take the settings from
local.settings.azure.jsonand copy them to'local.settings.json
{
    "IsEncrypted": false,
    "Values": {
        "AzureWebJobsStorage": "UseDevelopmentStorage=true",
        "FUNCTIONS_WORKER_RUNTIME": "dotnet",
        "AZURE_STORAGE_HOST": "blob.core.windows.net",
        "AZURE_STORAGE_ACCOUNT": "BLOB_STORAGE_ACCOUNT_NAME",
        "AZURE_STORAGE_CONTAINER": "azfuncblobs"
    }
}
Parameters:
BLOB_STORAGE_ACCOUNT_NAMEThe same name that you gave the storage account you created earlier.
Notes:
- We updated
AZURE_STORAGE_HOSTtoblob.core.windows.netinstead of127.0.0.1:10000. That setting is for Azure Public cloud, if you are using a different Azure cloud, then useaz cloud listto find your storage host.
Re-run the Azure Function
- Start and Run the Function
Run the following command from the root of the project:
func start
When it has finished starting it will output the URL to run the function, like this:
funcblobtest: [GET,POST] http://localhost:7071/api/funcblobtest
Open that link in a browser. Your function will run and you will see output like the following:
00e7d1bd.txt uploaded.
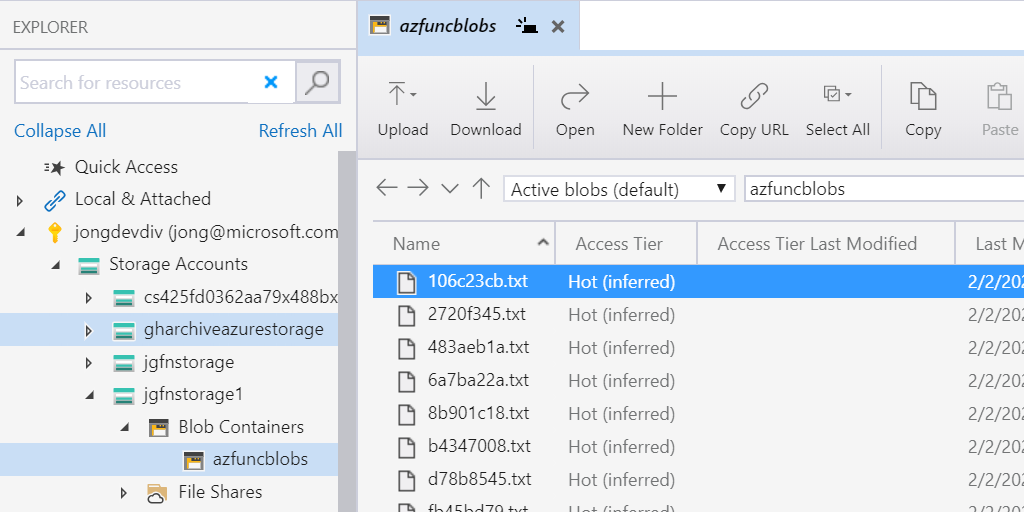
- Verify Success with Storage Explorer
Open Storage Explorer and navigate to: Subscription -> Storage Accounts -> Storage Account -> Blob Containers -> azfuncblobs
Verify that your file has been successfully uploaded.
Now that we have our local function uploaded blobs to Azure Storage, lets create the Azure Function in Azure, and use a Managed Identity instead of a Service Principal. Click on the Part 3 link below to continue.
Part 1: Local Function with Storage Emulator (local function, local storage)
Part 2: Local Function with Azure Storage and Service Principal (local function, cloud storage)
Part 3: Azure Function with Azure Storage and Managed Identity (cloud function, cloud storage)
Jon