The Azure IoT team just announced Custom Endpoints and Routes feature - which allows you to route IoT Hub messages to your own Event Hub, Service Bus Queues or Service Bus Topics. You define your alternate endpoints in “Endpoints” and you define your routing logic in “Routes”.
Update #1: Routes Based on Message Payload
You can now create routes based on message payload. You can read more about it here.
What are Some Use Cases for Endpoints and Routes?
This is very useful for customers that want to segregate messages for security or billing purposes. Imagine if you are using IoT Hub to build your own IoT SaaS product that has tenants. You will likely want to push all messages from each tenant into its own Event Hub so you can easily map Event Hub cost to a tenant. Endpoints and Routes is also a great way to integrate with other services, such as Logic Apps or Notification services or your own custom service.
What Do Endpoints and Routes Do Under the Covers?
When IoT Hub receives a message it first checks to see if there is a custom route available that matches a given rule. If there is a match it will send the message to that endpoint and not the Default Event Hub.

How do I Use Endpoints and Routes?
This video will walk you through the same exercise:
Azure Portal
You will now see Endpoints and Routes in your IoT Hub main screen.

We will set both of them up starting with Endpoints.
Define Your Endpoints
Event Hub, Service Bus Queues and Service Bus Topics are supported today, but more will come in the future.
The first thing you are going to want to do is create one of those if you don’t already have one. For this exercise, we’ll create an Event Hub.
1) Click on Endpoints
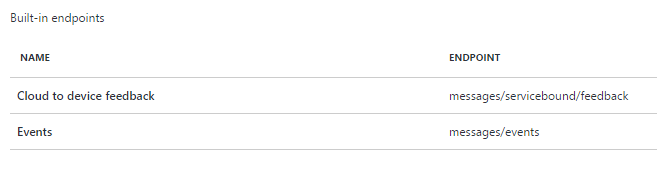
You will see the Built-in endpoints at the top
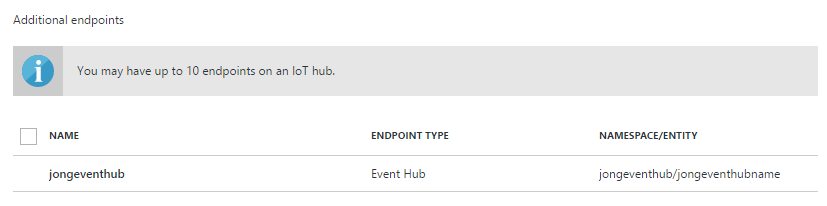
And right below that you will see “Additional Endpoints” and you can have up to 10 additional endpoints.

2) Click “Add”
Over in the right hand panel, you will see the Add Endpoint screen. I selected Event Hub and as you can see I don’t have an Event Hub defined in the same region as my IoT Hub.

3) Create an Event Hub
Open a new browser window and create an Event Hub in the same region as your IoT Hub, mine is East US.
4) Add Event Hub Endpoint
Go back to the IoT Hub Endpoints blade and refresh. You should now see your Event Hub. Select it and click OK.

You will now see it listed in “Additional Endpoints”
Define Your Routes and Rules
- Click on “Routes” and you’ll see the empty rule list. You can have up to 100 rules per IoT Hub

- Click “Add”
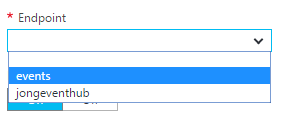
Give your rule a name, select your data source, add a query and select and endpoint to send the matching message to.
The rule works against the IoT Hub message properties. It does not inspect the payload of the message. The IoT Hub team has said message inspection is on their backlog.Routes based on payload are now supported, read more here.
You can find the Query String syntax docs here and here.

As you can see below, you can send the messages directly to the events endpoint or to the custom endpoint you created.
- Click OK and you will now see your Route Rule

Test It Out
-
Download this node.js script to your machine. https://gist.githubusercontent.com/jongio/8f478cbce44960628482e0491d3dccb1/raw/1183b42f48a768e62420d58d3a7779a9062ab7fa/iothubnodesend
-
Replace line 17 with your device’s connection string. You can create devices and get their connection strings using the IoT Device Explorer
-
Scroll to line 39 and change any of the properties to suit your needs.
-
Run the following to install the Azure IoT Node SDK
npm i azure-iot-device
npm i azure-iot-device-amqp
5. Open a command prompt and run the script
node index.js
You will now see this in your command prompt

You will now see the messages coming through to your Event Hub. You can use the Service Bus Explorer to view them. I just clone that repo and F5 from VS to run the Service Bus Explorer.
Notice in the Event Custom Properties section that tenant=1234 and location=sea, which is how we configured the message properties and how we setup the Route rule.

Hope this helps you get started with the new and very useful feature.
Jon
Related Links
- Blog Announcement: https://azure.microsoft.com/en-us/blog/azure-iot-hub-message-routing-enhances-device-telemetry-and-optimizes-iot-infrastructure-resources/
- Endpoints Documentation: https://docs.microsoft.com/en-us/azure/iot-hub/iot-hub-create-through-portal#endpoints & https://docs.microsoft.com/en-us/azure/iot-hub/iot-hub-devguide-endpoints
- Routes Documentation: https://docs.microsoft.com/en-us/azure/iot-hub/iot-hub-create-through-portal#routes
- IoT Hub Query Language Documentation: https://docs.microsoft.com/en-us/azure/iot-hub/iot-hub-devguide-query-language (Does not currently contain “Route rule query syntax”, but will soon)
- Messaging Documentation: https://docs.microsoft.com/en-us/azure/iot-hub/iot-hub-devguide-messaging