I was recently working with a customer that uses Apache Avro compression and discovered that there isn’t a great example out there that shows you how to send Avro compressed messages through the IoT pipeline. This post will hopefully fill that gap.
Compression is a very common need in IoT scenarios because most large scale IoT solutions include message aggregation and compression before sending the messages across the wire. IoT Hub itself “supports compression” because it doesn’t crack the message payload - it just treats the message as bytes across the wire. So, the cloud endpoint (IoT Hub) isn’t an issue. The issue arises when we need to use compression and then process those messages post-ingestion. Azure Stream Analytics, a common Azure IoT message ingestor, supports JSON, CSV and Avro. Gzip/Deflate are not supported, but the request has been made into the ASA team to support them. In the meantime, this post will demonstrate how to get Avro to work through the IoT pipeline and unblock those customers that want compression and are considering Avro. If you need to support Gzip/Deflate or any other compression mechanism, then you will need to process your IoT Hub messages via the backing Event Hub using Event Processor Host via Azure Functions, Service Fabric or any custom application.
The architecture for this walkthrough is as follows:
A Node.js script reads telemetry data from sensors, compresses that data with Avro and then sends to IoT Hub. An Azure Stream Analytics (ASA) job picks up those messages and forwards them to Azure Blob Storage as JSON objects.
You can follow along to build this entire example from scratch or you can click here, if you just want to jump to the Avro code.
Tools
Azure CLI 2.0
You have three options for creating the Azure resources required for this example. I will use Azure CLI 2.0 in this post.
1. Azure CLI 2.0
2. Azure CLI 1.0
3. Azure Portal
Follow the steps here to install Azure CLI 2.0.
iothub-explorer
We will use the iothub-explorer to monitor messages that are sent to IoT Hub.
Follow the steps here to install the iothub-explorer.
You could also use the Windows Form version called the Device Explorer.
Azure Storage Explorer
We will use Azure Storage Explorer to view the outputted messages that are sent to Blob storage from the ASA job.
Follow the steps here to install the Azure Storage Explorer.
IoT Hub
Create IoT Hub
Follow the steps here to create an Azure IoT Hub using the Azure CLI 2.0.
Get IoT Hub Connection String
Execute the following command to get the connection string for the IoT Hub you just created.
az iot hub show-connection-string --hub-name [your IoT Hub name]
Copy that connection string to a safe place. You will need it later.
Create IoT Hub Device
Execute the following command to create a new IoT Hub device.
az iot device create --hub-name [your IoT Hub name] --device-id [your IoT Hub device name]
Get Device Connection String
az iot device show-connection-string --hub-name [your IoT Hub name] --device-id [your IoT Hub device name]
Copy that device’s connection string to a safe place. You will need it later.
Create IoT Hub Consumer Group
You will need a new IoT Hub consumer group when you configure ASA later. Let’s create it now with the following command:
az iot hub consumer-group create --hub-name [your IoT Hub name] --name avrocg
Start Monitoring Events
Execute the following command to monitor events for the device you just created:
iothub-explorer monitor-events [your IoT Hub device name] --login "[your IoT Hub connection string goes here]"
You will see the following output:
Monitoring events from device avro-device...
Keep that command open, we’ll come back to it in a minute.
Run Avro Script
We will now get the Node.js code that will compress messages with Avro and send them to IoT Hub.
Let’s get it running and then go through code.
Install Node.js and git
Make sure you have Node.js and git installed.
Clone Repo
Open up a command prompt, navigate to an empty folder and execute the following command. This will copy the code to a local folder.
git clone https://github.com/jongio/azure-iot-stream-analytics-avro-nodejs.git
Install Node.js Packages
Change to the directory that contains the code you just cloned and execute the following command to get the Node.js packages locally.
npm i
Setup Config
This script uses dotenv to allow you to set an IoT Hub connection string in a .env file.
Rename “.env.sample” to “.env” and paste your device connection string that you saved earlier. If you are using Windows, then name the file .env. (with the . at the end) and Windows will automatically change it to .env for you.
iotHubConnectionString=[your device's connection string goes here]
Run Script
Execute the following to start sending messages to IoT Hub.
node index.js
You will now see the following output:
Connected to IoT Hub
Sending message: Obj╔╝avro.schema�╔{"name":"telemetry","type":"record","fields":[{"name":"deviceId","type":"string"},{"name":"windSpeed","type":"float"}]}avro.codecdeflate }4똑�%��
                                                                                                                                                                                    ��E��x╗�KI-�LN5��
}4똑�%��
        ��E��x
send status: MessageEnqueued
Sending message: Obj╔╝avro.schema�╔{"name":"telemetry","type":"record","fields":[{"name":"deviceId","type":"string"},{"name":"windSpeed","type":"float"}]}avro.codecdeflate �7�zXNObQU}��╗�KI-�LN5�=�
�7�zXNObQU}��
send status: MessageEnqueued
Sending message: Obj╔╝avro.schema�╔{"name":"telemetry","type":"record","fields":[{"name":"deviceId","type":"string"},{"name":"windSpeed","type":"float"}]}avro.codecdeflate ��b�zj����[���╗�KI-�LN5
                                                                                                                                                                                                   �

p╝ ��b�zj����[���
send status: MessageEnqueued
Monitor Messages Coming into IoT Hub
Switch back to the command prompt with iothub-explorer open and you will now start to see events outputted:
==== From: avro ====
Objavro.schema�{"name":"telemetry","type":"record","fields":[{"name":"deviceId","type":"string"},{"name":"windSpeed","type":"float"}]}avro.codecdeflate K=�8h
{�!���ng�q
�KI-�LN5��1r K=�8h
{�!���ng�q
====================
==== From: avro ====
Objavro.schema�{"name":"telemetry","type":"record","fields":[{"name":"deviceId","type":"string"},{"name":"windSpeed","type":"float"}]}avro.codecdeflate ӣ ��މ�]#��T��
�KI-�LN5\��� ӣ ��މ�]#��T��
====================
Inspect Avro Script
Now that we have it running, let’s take a look at the script to see how it works.
You can see the full code on GitHub here. There are lots of comments inline that should help you see how it all works together.
The script uses following npm packages: avsc, memory-streams, azure-iot-device and azure-iot-device-amqp.
With Avro, you can embed the payload schema into the Avro Container file. In this repo, we have a file called schema.avsc, which looks like this:
{
    "name": "telemetry",
    "type": "record",
    "fields": [
        { "name": "deviceId", "type": "string" },
        { "name": "windSpeed", "type": "float" }
    ]
}
In fact, ASA requires the schema to be embedded into the message payload.
This file Avro type is loaded via the parse method like this:
const type = avro.parse(__dirname + '/schema.avsc');
At the moment, ASA does not support ENUMs in your Avro schema. Convert the ENUM to string if you are having issues. I will update this post when that has been resolved.
The meat of the code is as follows:
- Instantiate a BlockEncoder with deflate codec
- Instantiate a WriteableStream and pipe BlockEncoder writes to it.
- Write to the BlockEncoder
- Call BlockEncoder.end();
- Send IoT Hub message in the ‘end’ event handler, which calls WriateableStream.toBuffer()
// Instantiate a BlockEncoder, which allows you to write avro into a buffer.
var avroEncoder = new avro.streams.BlockEncoder(type, { codec: 'deflate' }); // Choose 'deflate' or it will default to 'null'

// Instantiate a stream to write the avro buffer to, which we'll send to IoT Hub
var writer = new streams.WritableStream();
avroEncoder.pipe(writer);

// Generate the faux json
var windSpeed = 10 + (Math.random() * 4); // range: [10, 14]
var json = { deviceId: 'device1', windSpeed: windSpeed };

// Write the json
if (type.isValid(json)) {
    avroEncoder.write(json);
}

// Call end to tell avro we are done writing and to trigger the end event.
avroEncoder.end();

// end event was triggered, get the avro data from the piped stream and send to IoT Hub.
avroEncoder.on('end', function () {
    // call toBuffer on the WriteableStream and pass to IoT Hub message ctor
    var message = new Message(writer.toBuffer());

    console.log('Sending message: ' + message.getData());
    client.sendEvent(message, printResultFor('send'));
})
While this seems like a pretty straight forward script, it took me a while to get it all working. In the process, I collected the following Avro related resources:
- Avro Node.js Library: mtth/avsc
- Reading and Writing Avro Files From the Command Line
- Node.js Stream Docs
- Creating duplex streams with Node.js
- How to send compacted data to Azure Stream Analytics?
- Sending and consuming events in Avro format
- Rotate stream into google cloud storage #75
- BlockEncoder produces invalid avro format? #17
- avro-cli-examples
Azure Blob Storage
For this contrived exercise, we’re going to configure a Blob Storage account that ASA sends all messages to. Let’s create the account and then wire up ASA.
Create Azure Blob Storage
az storage account create --sku Standard_LRS --resource-group [your resource group] --location eastus --name [enter storage name here]
You will see the storage account meta data outputted to the screen.
Azure Stream Analytics
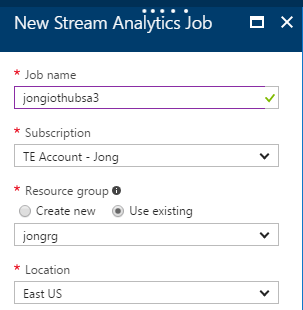
Create Azure Stream Analytics Job
Go to the Azure Portal and create a new Azure Steam Analytics job:
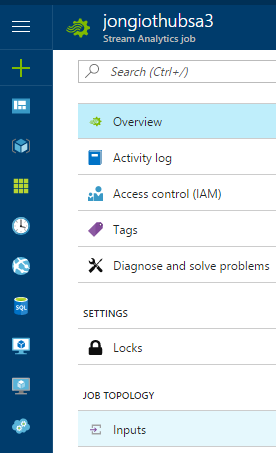
Wire Up IoT Hub Input
1. Go to the ASA job you just created and click on Inputs.
Something to be aware of, ASA does not allow you to test the input with a physical Avro container file, like it does with JSON/CSV. The only way to test Avro is to send the message to the ASA Input and view the logs if you have issues. The logs are not that helpful as all it says is the file is invalid.
2. Click Add and create a new Input

There are two bugs in the Azure Portal on this screen:
- You can’t select Avro using your mouse. You must use your keyboard arrows in the “Event Serialization Format” dropdown.
- You can’t use $Default consumer group. Use the consumer group you created earlier, I called mine avrocg.
Wire Up Blob Storage Output
3. Click on Outputs, click Add and create a new Input
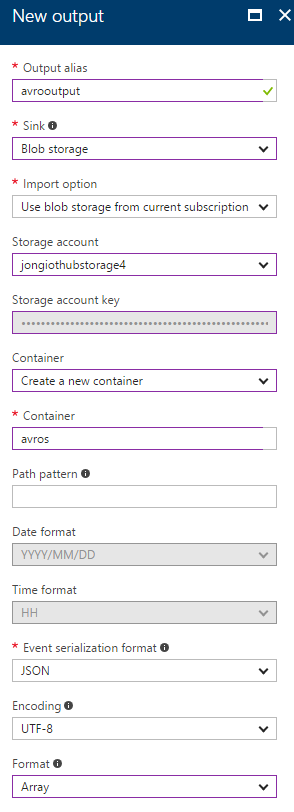
- Select the Blob Storage Account you created earlier
- Select Create a new container and name it
avros.
Write ASA Query
4. Click on Query, then enter the following query into the query text box.
SELECT
    *
INTO
    avrooutput
FROM
    avroinput

This query is intentionally simple because this post is about wiring everything up and not sophisticated ASA queries.
5. Click Save
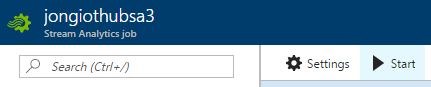
Start ASA Job
Click ‘Overview’, then click Start
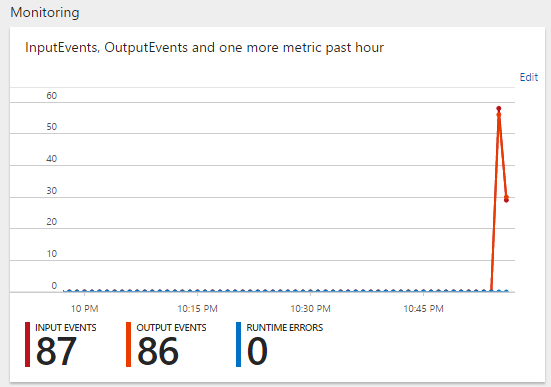
Once the ASA job is started, you will see the following monitoring visual in the Azure Portal.
If you have any issues, please refer to the Activity log tab to see if any messages are being logged.
View Blob Storage Messages
We’ll now use the Azure Storage Explorer to inspect the JSON messages that have been stored in Blob Storage.
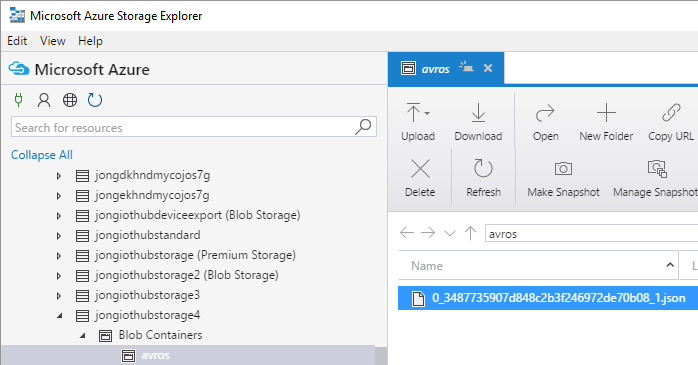
1. Open Azure Storage Explorer, sign-in and navigate to the Blob Storage account you created earlier. Expand the Blob Containers node. Click on ‘avros’ and you will see a JSON file in the right pane.
2. Double-click on that file to download it. Open it and you will see the JSON messages.
{
    "deviceId": "device1",
    "windSpeed": 11.22899055480957,
    "EventProcessedUtcTime": "2017-05-05T05:52:52.0236378Z",
    "PartitionId": 0,
    "EventEnqueuedUtcTime": "2017-05-05T05:51:52.7660000Z",
    "IoTHub": {
        "MessageId": null,
        "CorrelationId": null,
        "ConnectionDeviceId": "avro-device",
        "ConnectionDeviceGenerationId": "636295329478829335",
        "EnqueuedTime": "2017-05-05T05:51:53.2330000Z",
        "StreamId": null
    }
}
Conclusion
We now have all of the services setup and running that enable Avro compression in an Azure IoT solution.
1. Avro Node.js Script is sending messages to IoT Hub
Sending message: Obj╔╝avro.schema�╔{"name":"telemetry","type":"record","fields":[{"name":"deviceId","type":"string"},{"name":"windSpeed","type":"float"}]}avro.codecdeflate x║���N;:i>&�N��╗�KI-�LN5<r
0� x║���N;:i>&�N��
send status: MessageEnqueued
2. IoT Hub is receiving messages.
==== From: avro-device ====
Objavro.schema�{"name":"telemetry","type":"record","fields":[{"name":"deviceId","type":"string"},{"name":"windSpeed","type":"float"}]}avro.codecdeflate u+q��?�Bw�F�_
�KI-�LN5ly� u+q��?�Bw�F�_
====================
3. Azure Stream Analytics is picking up messages from IoT Hub and saving them as JSON to Blob Storage
{
    "deviceId": "device1",
    "windSpeed": 11.22899055480957,
    "EventProcessedUtcTime": "2017-05-05T05:52:52.0236378Z",
    "PartitionId": 0,
    "EventEnqueuedUtcTime": "2017-05-05T05:51:52.7660000Z",
    "IoTHub": {
        "MessageId": null,
        "CorrelationId": null,
        "ConnectionDeviceId": "avro-device",
        "ConnectionDeviceGenerationId": "636295329478829335",
        "EnqueuedTime": "2017-05-05T05:51:53.2330000Z",
        "StreamId": null
    }
}
Hope this helps you out.
Jon