How to use NETWORK SERVICE account with SyncBack scheduled tasks
SyncBack is a great backup and sync utility, but by default it creates Windows XP scheduled tasks which do not support running under a NETWORK SERVICE account and there’s no way to change that through the SyncBack interface.
Here’s my work around:
1. Create the job in SyncBack
2. Right click on the job and create the schedule as you normally would.
3. Back to Windows…click Start type “schedule” and select “Task Scheduler”
4. Click on “Task Scheduler Library” in the left hand tree.
5. Double click the SyncBack task that was created by SyncBack.
6. Click on the General Tab. Click Change User or Group…
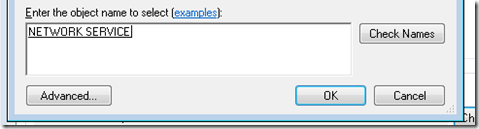
7. Enter “NETWORK SERVICE”. Click OK
8. Select “Windows 7, Windows Server 2008 R2” in the Configure for dropdown

Hope this helps you out.
Jon
Share on LinkedIn
Quick Share: Your custom post text has been copied to your clipboard! Click the button below to open LinkedIn's share dialog, then paste it.
💡 Tip: LinkedIn will open in a new tab. Use Ctrl+V (or Cmd+V on Mac) to paste your text.
Note: LinkedIn will show the article preview. You can add your custom text above it.