I’ve spent a good part of the last 15 years doing .NET development. When I joined IoT and started getting ramped up, I quickly discovered that it is largely an unmanaged non-.net non-Microsoft world. I’m having a blast learning everything, but I can’t get over the hunch that there are a bunch of devs out there who want to be makers, but aren’t because of the disconnect in technology. I’m positive this mindset is out there: “I want to be a maker, but I don’t know Linux, I don’t know c++ and I don’t have a ton of time to learn everything”. My new passion is helping Microsoft learn about, discover and adapt to the maker movement and meet people where they are and to help Microsoft-tech developers become makers.
Microsoft-tech devs have a couple of options. You could get a Netduino or Gadgeteer - which run on the .NET Micro Framework. You could get a Galileo – which runs Windows. But did you know that you could also use .NET on RaspberryPi with Mono? People typically use python on RaspberryPi, but if your comfort zone is .NET then .NET on RaspberryPi with Mono is worth checking out.
In this post we’ll build a standard .NET console app with Visual Studio and run it on a RaspberryPi with Mono. The only real magic is Mono, the rest is stock .NET. I don’t even need Mono on my Windows machine. I just write a Console app like I do any other Console app. Deploy it to my Pi and run it with Mono. Xamarin Studio is not required.
Let’s build a simple Blinky console app (which is the Hello World for maker projects). I’ll show you how to get your RaspberryPi setup with Mono, how to write to pins and how to deploy and run your code.
I’m using Visual Studio 2013, RaspberryPi model B and Windows 8.1.
RaspberryPi Setup
1. Setup Linux on Pi
Get Occidentalis v0.2
Make Occidentalis SD card
Run first time config
2. Configure Network
Plug Ethernet Cable into Pi
Setup Samba for NetBIOS name or give it a static IP. This is so you can deploy your code to the Pi
-
Samba route: http://www.openframeworks.cc/setup/raspberrypi/Raspberry-Pi-SMB.html – Takes longer than static IP route, but better long term.
-
Mount as a Windows drive: http://rasspberrypi.wordpress.com/2012/09/04/mounting-and-automounting-windows-shares-on-raspberry-pi/* Static IP: https://www.modmypi.com/blog/tutorial-how-to-give-your-raspberry-pi-a-static-ip-address
3. Setup Remote Desktop (Optional)
This is so you can use your main computer's mouse and keyboard instead of having to go back and forth between the Pi and your desktop. I've found this link the quickest way with xrdp
[http://www.maketecheasier.com/enabling-remote-desktop-access-on-raspberry-pi/](http://www.maketecheasier.com/enabling-remote-desktop-access-on-raspberry-pi/ "http://www.maketecheasier.com/enabling-remote-desktop-access-on-raspberry-pi/")
4. Setup SFTP
You are going to deploy your code from your Windows machine to your Pi via SFTP. Here's how with FileZilla
http://trevorappleton.blogspot.com/2014/03/remotely-copy-files-to-and-from-your.html
5. Install Mono
Run this command from RaspberryPi terminal to install mono.
sudo apt-get install mono-complete
6. Setup LED
This is intentionally very simple because this post is about showing .NET on Pi versus what can be done with Pi.
- 1x LED
- 1x 220ohm resistor
- 1x Breadboard
- 2x Jumper Wires
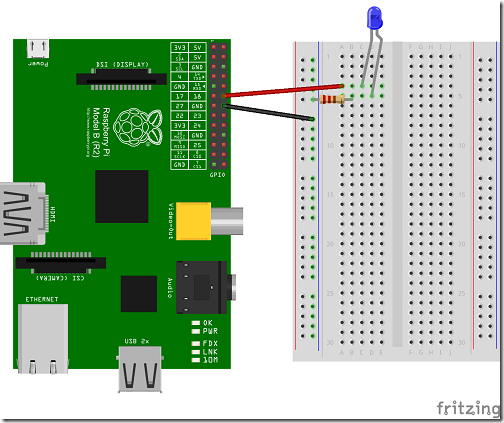
There are two ways to look at Pi wiring Board layout and BCM, this is great resource for making sure you are using the right pin numbers: http://pi.gadgetoid.com/pinout. We’ll use the “Board” physical layout, so the 6th pin down from the outer rail is 12.
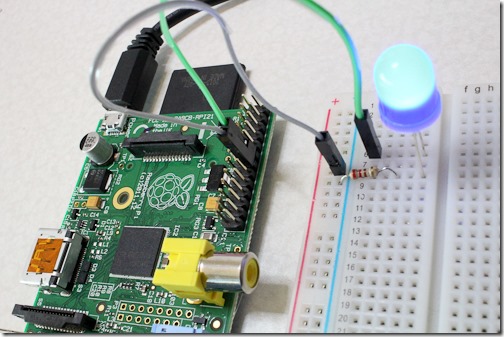
1. Place LED in breadboard
2. Connect Pin 18 to LED Annode (the long lead) via jumper wire.
3. Connect Ground to breadboard
4. Connect resistor from Ground to LED Cathode (the short lead)
[
C# Console App
We are going to use the stock Visual Studio C# console app template. Go ahead and create a Console app.
We are going to also use the Raspberry.IO.GeneralPurpose nuget package to talk to the GPIO pin 18. Go ahead and add a reference to that. GPIO = General Purpose Input Output
That library has a Toggle method so let’s just use it. The code is super simple. Just configure the pin, init a GpioConnection and call Toggle.
This code is also on GitHub: https://github.com/jongio/dotnet-raspberrypi-mono
using Raspberry.IO.GeneralPurpose;
using System;
using System.Collections.Generic;
using System.Linq;
using System.Text;
using System.Threading;
using System.Threading.Tasks;

namespace dotnet_raspberrypi_mono
{
    class Program
    {
        static void Main(string[] args)
        {
            OutputPinConfiguration pin12 = ConnectorPin.P1Pin12.Output();
            pin12.Enabled = false;

            using (GpioConnection connection = new GpioConnection(pin12))
            {
                while (!Console.KeyAvailable)
                {
                    connection.Toggle(pin12);
                    Thread.Sleep(250);
                }
            }
        }
    }
}
Build the app in Visual Studio.
Deploy to RaspberryPi
If using samba w/ mapped drive, just output the code to the drive. If using FileZilla then just copy the bin/Debug folder to a folder in a directory such as /home/pi/dotnet-raspberrypi-mono
It’s just an xcopy deploy.
Run app on Pi
Log into your Pi. Open a terminal. Navigate to the exe you just copied over and execute this command.
sudo mono dotnet-raspberrypi-mono.exe
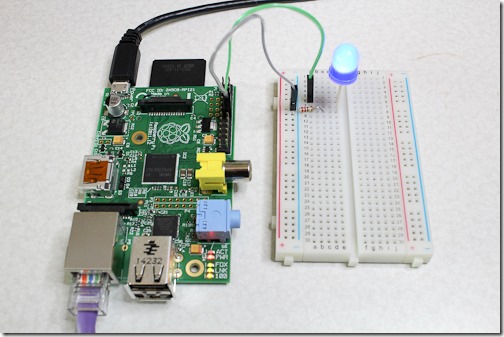
Your LED should now be blinking!
I hope this quick sample gets you going with RaspberryPi and .NET – and helps you become a maker.
Jon

