 I’m continuing to build out “beakn” my DIY Lync Status light. This is what I’m calling a “maker experience” project. I want to know what a maker goes through to build things so I’m building it with as many different platforms as possible. I’ve built it with Arduino and Netduino. Version 0.1 brought us a USB connected light. Version 0.2 introduced Ethernet and MQTT. Version 0.3 includes the following:
- RaspberryPi running a .NET Console app via Mono
- Upgraded my breadboard to a custom shield.


Up until a few days ago I didn’t realize (or it didn’t click) that we could run .NET applications on RaspberryPi. I’ve heard about Mono, but haven’t really have a chance to play with it enough for it to sink in. MS Open Tech released ConnectTheDots.io (a site to help people get up and going with IoT devices and Azure) this week and in that they have a RaspberryPiGateway – which uses a .NET console app and Mono. I saw that. It clicked - and of course I had to give it a try for beakn, which led to this post.
I just did a post on “How to run .NET on RaspberryPi with Mono”, so start there to see how things work and then come back to build the beakn. I also recommend that you read through the v0.1 and v0.2 posts before moving on so you can see how we got to this point.
The “beakn” has three main components
1. A Windows desktop application that sends messages to an MQTT broker when your Lync status changes
2. An MQTT broker to receive the Lync status messages
3. A hardware app that responds to MQTT messages and sets the right LED. Red=Busy, Yellow=Away, Green=Free
#1 and #2 above have changed very little with this version and #3 is now a RaspberryPi instead of an Arduino or Netduino.
Here’s how to get v0.3 setup on your own.
Step 0: Get the beakn Hardware setup
Supplies
1. Ping Pong Ball
2. Cardboard box
3. Breadboard or protoboard. I’m now using a protoboard instead of breadboard. Mainly because I was taking this thing apart so many times and it was become a pain to get everything setup each time.
4. RaspberryPi Model B or any model with Ethernet
5. 3 10mm LEDs
6. Some Jumper wires. Number of wires depends on how you build.
7. 220ohm resistor
Everything (except the RaspberryPi is the same as v0.2 so please read through that first.
Connect the LEDs like so:
Board Pin 12: Red
Board Pin 16: Yellow
Board Pin 18: Green
Put a 220ohm resistor on the cathode. See photos and circuit diagram for possible setup.
[


As you can see my cardboard box has seen better days, but you’ll likely need to cut a few more holes to get the Ethernet and USB Power connected.

Step 1: Install or Build the beakn desktop application.
You can install the desktop app directly from GitHub here: https://github.com/jongio/beakn/releases/download/v0.3/beakn.v0.3.msi
Or you can get the source and build it yourself
https://github.com/jongio/beakn/tree/master/desktop
Step 2: Modify the beakn.exe.config file
Open a CMD prompt as Administrator and navigate to the beakn install directory.
Change the MqttPairingCode to something unique. Remember what you set this to because you’ll need it later when you install RaspberryPi app.
Restart beakn.exe. You go into Task Manager and kill it first. Sorry not having a better solution here. Will fix at some point.
Step 3: Install the RaspberryPi .NET Console app.
Go through my “How to run .NET on RaspberryPi with Mono” post to get Mono and working on Pi.
You can either copy the compiled version onto your Pi from this zip: https://github.com/jongio/beakn/releases/download/v0.3/beakn.raspberrypi.v0.3.zip
Or you can get the source and built yourself:
https://github.com/jongio/beakn/tree/master/raspberrypi/beakn.raspberrypi
The console app that runs on the Pi is plain jane stock .NET without Xamarin Studio. It uses the M2Mqtt library to talk with the MQTT broker and Raspberry.IO.GeneralPurpose library to talk to the RaspberryPi pins.
Step 4: Modify the RaspberryPi beakn.exe.config file
Open the config file and change the MqttPairingCode to the same code you used in Step 2 above. You can do this directly on the Pi with “sudo nano beakn.exe.config” or you can do on desktop and copy over.
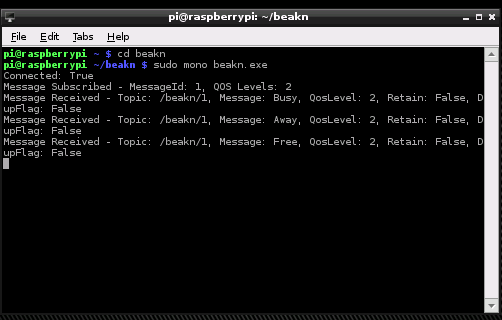
Step 5: Run the RaspberryPi beakn.exe using this command.
sudo mono beakn.exe
You should see something like this:
Step 6: Make RaspberryPi beakn automatically start
Linux uses /etc/rc.local to list projects that automatically start when the Pi is started.
This link was helpful: http://www.raspberry-projects.com/pi/pi-operating-systems/raspbian/auto-running-programs
Open rc.local to edit.
sudo nano /etc/rc.local
Add this line, your path to beakn.exe is where you copied it to – likely different than below.
sudo mono /home/pi/beakn/beakn.exe &
That’s it! You should now see your beakn change color when your Lync status changes.
Jon